
Create, edit and apply gradients to strokes and fills in Adobe Illustrator.

Gradients
The Gradient Tool is a very powerful one. And with great power comes great responsibility. We’ll learn to wield it like a true Jedi Master. The danger here is to create muddy color transitions between our gradient stops. We’ll build a drawing of a pencil using gradients in class. Once you’re done, you’ll possess secrets of the Gradient Tool.


This pencil gets its shading with the gradient tool. There are linear and freeform gradients.
We’ll explore:
The Gradient Panel
The Gradient Tool
The Gradient Annotator
Linear gradients
Radial gradients
Freeform gradients
Gradients on a path
Selecting colors for tasteful gradients
Opacity in gradients
Blends
The end-product of a blend can often look like a gradient, but they’re much more versatile.
"You can blend objects to create and distribute shapes evenly between two objects. You can also blend between two open paths to create a smooth transition between objects, or you can combine blends of colors and objects to create color transitions in the shape of a particular object." -Adobe

This banner is created with blends."
We’ll practice creating blends in class, starting with the basics, then move on to more advanced techniques. We’ll draw a banner like this one, which contains a number of blends. Some are masked. Some are not. They’re all stacked to create this wonderful graphic.
Create or Edit a Pattern

Do one of the following:
To create a pattern, select the artwork that you would like to create the pattern from, and then choose Object > Pattern > Make.
To edit an existing pattern, double-click the pattern in the pattern swatch, or select an object containing the pattern and choose Object > Pattern > Edit Pattern.
(Optional) In the Pattern Options dialog, provide a new name for the pattern, or modify the existing name. (name each pattern created with a keyword and the "brick offset" or "Tile Type" or both.)
Modify the other options available in the Pattern Options dialog:
Tile Type Choose how to lay out the tiles:
Grid. The center of each tile is horizontally and vertically aligned to the center of the adjacent tiles.
Brick by row. Tiles are rectangular in shape, and arranged in rows. Centers of tiles in rows are horizontally aligned. Centers of tiles in alternate columns are vertically aligned.
Brick by column. Tiles are rectangular in shape, and arranged in columns. Centers of tiles in columns are vertically aligned. Centers of tiles in alternate columns are horizontally aligned.
Hex by column. Tiles are hexagonal in shape, and arranged in columns. Centers of tiles in the columns are vertically aligned. Centers of tiles in alternate columns are horizontally aligned.
Hex by row. Tiles are hexagonal in shape, and arranged in rows. Centers of tiles in the rows are horizontally aligned. Centers of tiles in alternate rows are vertically aligned.
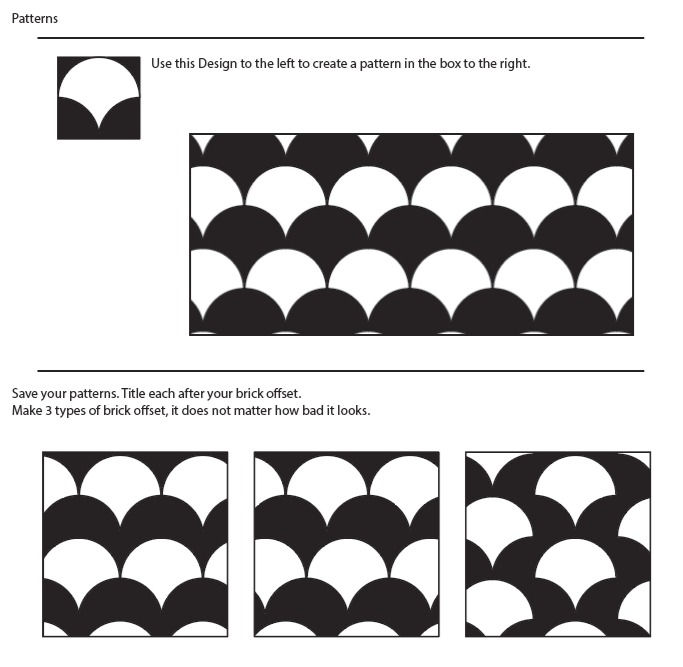
Brick Offset Apply to:
Brick by Row. Determines by how much tile width the centers of tiles in adjacent rows are out of vertical alignment.
Brick by Column. Determines by how much tile height the centers of tiles in adjacent columns are out of horizontal alignment.

Width / Height Specify the overall height and width of the tile. Choose various values, smaller or larger than the height and width of the artwork. Values larger than the size of the artwork cause the tile to grow larger than the artwork, and insert empty space between tiles. Values smaller than the size of the artwork cause artwork in adjacent tiles to overlap.
Size Tile to Art Select this option to cause the size of the tile to shrink to the size of the artwork being used to create the pattern.
Move Tile with Art Select this option to ensure that moving the artwork causes the tile to move as well.
H Spacing / V Spacing
Determine how much space to place between adjacent tiles.
Overlap When adjacent tiles overlap, determine which tiles appear in front.
Copies Determine how many rows and columns of tiles are visible while modifying the pattern.
Dim Copies to Determine the opacity of copies of the artwork tile previewed while modifying the pattern.
Show Tile Edge Select this option to display a box around the tile.
Show Swatch Bounds Select this option to display a unit portion of the pattern that is repeated to create the pattern.
In the bar below the Control Panel, choose to save or discard changes to the pattern.
Class Activity
Download the provided file and complete the gradients and blend illustrations as directed below.
Gradients
Use gradients to add color to the ping-pong paddle and ball.

There are linear, radial and free-form gradients here.
Feel free to use color swatches from Illustrator’s swatch libraries to get the wood colors. Add them to your Swatches panel
Blends
Draw a coloring pencil like the one shown below. You choose the color of the pencil. These are the steps.

You can leave copies of artwork as you go to show the steps as I have done above.
Komentarze